Did you notice the new link up top? I've added a new page to my blog that talks about Private Classes. I've had several customers express an interest in attending classes, so I've come up with a way to give you what you've asked for! The beauty of this is that you still get to receive FREE hostess products. Normally for a class, I would reap the benefits of orders placed.
Do you want to make more that just a couple or cards? This is for you! You can choose to make 4, 8, or 12 cards! When you choose to make 8 cards it will be 2 each of 4 different designs or when you choose to make 12 cards it will be 3 each of 4 different designs.
Or would you rather make scrapbook pages? You can choose to make a double-page 12x12 layout (2 pages). Want more? Choose to make 2 12x12 double-page layouts (4 pages). With a private class you get to pick what you want to do!
I'm sure this is going to be very popular. Click on the link above and check it out and then call or email me to get your own private class scheduled! Don't hesitate to contact me with any additional questions you might have!
Michelle

Thursday, March 22, 2012
Wednesday, March 21, 2012
Mixed Bunch 3x3 Note Cards and Box
Yesterday I showed you the door prize from my last workshop and today I would like to share with the hostess gift. I made some very simple 3x3 cards with coordinating envelopes and packaged them in a matching box. I never dreamed that I would like this stamp set so much, but I just can't stop using it!

The photo above shows the entire set...isn't it great? These little 3x3 cards are so versatile. They can be used to send a quick note or even as a gift tag. There are 4 cards with coordinating envelopes. The new Simply Scored Diagonal Plate makes creating these envelopes and the box a breeze!
 I started with Pool Party card stock to 6" x 3" folded in half for my card base. The next layer is one of the patterns from the Everyday Enchantment Designer Series Paper (DSP) pack. This paper is only available as a Sale-a-bration item. The good news is that you can get this paper for FREE with a qualifying order. The bad news is that it is only available until March 31st. I LOVE this paper and do not want to see it going away! The DSP is 2 3/4" x 2 3/4" and embossed with the Stripes Textured Impressions Embossing Folder. The embossing folder, too, is a Sale-a-bration item that you can earn for FREE!

I used the Mixed Bunch stamp set and coordinating Blossom Punch for the focal piece on the card. The bottom flower is punched from another pattern from the Everyday Enchantment DSP. Layered on top of that is flower stamped in Pool Party on Very Vanilla card stock and punched out. The center of the flower comes from the same stamp set, stamped in Lucky Limeade ink on Very Vanilla card stock, and punched out with the 1" circle punch. The center is then completed with a Pool Party Designer Printed Brad. I used a few Stampin' Dimensionals to give the flower some, well...dimension, of course!

 Next, I created the matching envelopes using the new Simply Scored Diagonal Plate. This amazing new tool allows you make coordinating envelopes quickly and easily. When you purchase the Diagonal Plate you receive instructions for 4 different sized envelopes. However, you can make an envelope to fit any size card you make!
There are lots of resources available with measurements and instructions. You may have seen Donna Griffith's demonstration for how to create an envelope for the standard 4-1/4" x 5-1/2" card. If you haven't, be sure to check it out! Also, fellow demonstrator Jackie Topa has put together a FABULOUS envelope resource on her Addicted To Stamping blog. It's a reference guide for creating envelopes for 28 different sizes of cards! She includes envelopes for gift cards, invitations, thank you notes, and much more! Awesome! Here is the handy Diagonal Score Plate Envelopes PDF! Plus, you can see a quick video on how to put several different ones together on her Make-Your-Own Envelopes post.
 So with the 4 coordinating envelopes complete, now it's on to the box. Again, this box is made using the Diagonal Plate. This time the card stock is Lucky Limeade. The flower is the same as on the card.
I'm loving this new tool...the possibilities are endless! And again, fortunately for me, another fellow demonstrator provided all the instructions and measurements! I love Stampin' Up! demonstrators, they make my job so easy! The instructions for the box came from Angie Leach at Too Cool Stamping. She shared this box along with the tutorials at our last demonstrator meeting.
You can find the tutorials here:
Time is running out to get this beautiful Everyday Enchantment Designer Series Paper! Visit my Online Store or contact me today to place your order.
Thanks for stopping by!
Michelle

The photo above shows the entire set...isn't it great? These little 3x3 cards are so versatile. They can be used to send a quick note or even as a gift tag. There are 4 cards with coordinating envelopes. The new Simply Scored Diagonal Plate makes creating these envelopes and the box a breeze!
 I started with Pool Party card stock to 6" x 3" folded in half for my card base. The next layer is one of the patterns from the Everyday Enchantment Designer Series Paper (DSP) pack. This paper is only available as a Sale-a-bration item. The good news is that you can get this paper for FREE with a qualifying order. The bad news is that it is only available until March 31st. I LOVE this paper and do not want to see it going away! The DSP is 2 3/4" x 2 3/4" and embossed with the Stripes Textured Impressions Embossing Folder. The embossing folder, too, is a Sale-a-bration item that you can earn for FREE!
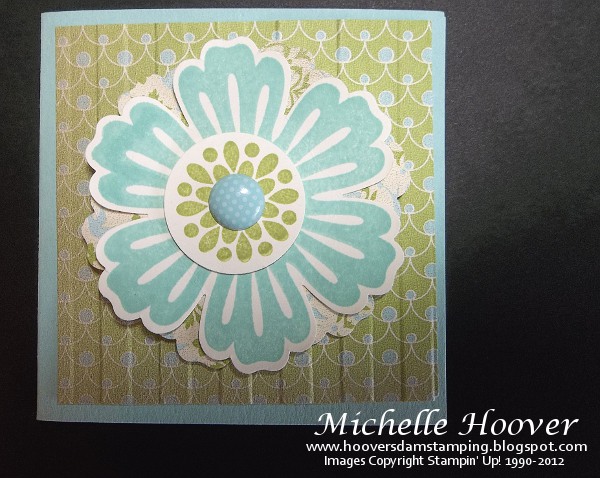
I used the Mixed Bunch stamp set and coordinating Blossom Punch for the focal piece on the card. The bottom flower is punched from another pattern from the Everyday Enchantment DSP. Layered on top of that is flower stamped in Pool Party on Very Vanilla card stock and punched out. The center of the flower comes from the same stamp set, stamped in Lucky Limeade ink on Very Vanilla card stock, and punched out with the 1" circle punch. The center is then completed with a Pool Party Designer Printed Brad. I used a few Stampin' Dimensionals to give the flower some, well...dimension, of course!

 Next, I created the matching envelopes using the new Simply Scored Diagonal Plate. This amazing new tool allows you make coordinating envelopes quickly and easily. When you purchase the Diagonal Plate you receive instructions for 4 different sized envelopes. However, you can make an envelope to fit any size card you make!
 There are lots of resources available with measurements and instructions. You may have seen Donna Griffith's demonstration for how to create an envelope for the standard 4-1/4" x 5-1/2" card. If you haven't, be sure to check it out! Also, fellow demonstrator Jackie Topa has put together a FABULOUS envelope resource on her Addicted To Stamping blog. It's a reference guide for creating envelopes for 28 different sizes of cards! She includes envelopes for gift cards, invitations, thank you notes, and much more! Awesome! Here is the handy Diagonal Score Plate Envelopes PDF! Plus, you can see a quick video on how to put several different ones together on her Make-Your-Own Envelopes post.

I'm loving this new tool...the possibilities are endless! And again, fortunately for me, another fellow demonstrator provided all the instructions and measurements! I love Stampin' Up! demonstrators, they make my job so easy! The instructions for the box came from Angie Leach at Too Cool Stamping. She shared this box along with the tutorials at our last demonstrator meeting.
You can find the tutorials here:
- Large Card Box (standard size cards) by Jackie Topa—11x11", scored at 3-1/2" and 5-1/2" on two opposite sides, and 4-1/2" and 6-1/2" on other two opposite sides.
- Small Card Box (3x3" cards, without envelopes) by luvinstampinup—6x6" square, scored at 2-1/4 and 3-1/4" all sides.*
Time is running out to get this beautiful Everyday Enchantment Designer Series Paper! Visit my Online Store or contact me today to place your order.
Thanks for stopping by!
Michelle
Tuesday, March 20, 2012
Workshop Door Prize
Today I'd like to share with you the door prize that I gave away at my workshop this past Sunday.
 Isn't this little "Easter bonnet" adorable? I saw one of these for the first time about a year ago made by Angie Leach. You can visit her Too Cool Stamping blog to see the one she made. Beckie F. was the lucky winner. Beckie is one of my Stamp Club members, a great customer, and a fabulous friend! So, not only is this just super cute as is...I filled it with an assortment of buttons! Congrats Beckie!

These "bonnets" are a great way to reuse your empty button, brad, and trinket containers. Simply cover with your favorite paper and embellishments and you have a great little gift container!

I used the Twitterpated Designer Series Paper from the Occasions Mini Catalog to cover my container. The top is punched out with the 2 1/2" Circle Punch. I used a different pattern to wrap around the container. These strips were cut at 1/2" x 9 and 1/4" x 9. The ribbon is Pear Pizzazz 1/2" Stitched-Polly. I used Tombow Multi-Purpose Adhesive to adhere to the paper and the ribbon.
 The bottom is cut using the Big Shot and the Scallop Circle #2 Bigz Die. The scallop circle was then embossed with the Vintage Wallpaper Textured Impressions Embossing Folder. I used a little Sticky Strip to adhere it to the bottom of the container.
The cute little flower made using Baja Breeze and Blushing Bride Card Stock. It's held together with a white brad from the 3/16" Brads - Neutural Collection and adhered to the container with a couple of Mini Glue Dots.
I hope you enjoyed this little project. Maybe it will inspire you to reuse some of those empty containers sitting around. I love to see what you come up with!
Thanks for stopping by!
Michelle
Mocha Morning Birthday
I absolutely LOVE the Morning Mocha Designer Series Paper! I have to admit that I have been hording quite a bit of it...LOL! So, I finally made myself use some of it for this card.

 |
| February Edition of Stampin' Sucess |
I saw this card in the February edition of the Stampin' Success magazine. This is just one of the many benefits of being a Stampin' Up! demonstrator! We receive a monthly magazine loaded with tips and ideas. The card that I CASE'd used the Attic Boutique Designer Series Paper from the 2012 Occasions Mini Catalog.

My card starts off with a Crumb Cake card base with a layer of Morning Mocha Designer Specialty Series Paper and it accented with the Lace Border Punch in Wild Wasabi. You probably can't tell from the photos, but the Mocha Morning paper has black flocking on it. It is so beautiful! I also love how the color combination worked out!


I finished the card off with a little flower using Boho Blossoms Punch and added a black brad to the center. This is adhered with a couple of Mini Glue Dots.
Would you like to make this card? If so, I'd love to show you how! Contact me to schedule a workshop or your own private class. Yes, I said your own private class! This is going to be a new option for my customers who do not want to host a traditional workshop. Private classes are a great way to learn more stamping techniques and tricks with your friends. This class setting also allows you to spend more time making cards than listening to me ramble on like I do at a traditional workshop. Private classes are customized to what you want to do. Plus you still get the hostess benefits like you would with a traditional workshop...the best of both worlds! Give me a call or send me an email and I'll explain all of the details!


List of supplies used:
Stamps: Apothecary Art and Loving Thoughts
Ink and Markers: Early Espresso Classic Ink , Wild Wasabi and So Saffron Stampin' Write Markers
Paper: Mocha Morning Specialty Designer Series Paper and Crumb Cake, Wild Wasabi, and Very Vanilla Card Stock
Accessories: Black Brad from the 3/16" Brads - Neutrals Collection
Tools: Large Lace Ribbon Border Punch, Big Shot, Labels Collection Framelits Dies, Stampin' Dimensionals, and SNAIL Adhesive
Thanks for stopping by!
Michelle
Subscribe to:
Comments (Atom)