Showing posts with label Sale-a-Bration. Show all posts

Wednesday, March 21, 2012

Mixed Bunch 3x3 Note Cards and Box

Yesterday I showed you the door prize from my last workshop and today I would like to share with the hostess gift.  I made some very simple 3x3 cards with coordinating envelopes and packaged them in a matching box.  I never dreamed that I would like this stamp set so much, but I just can't stop using it!


The photo above shows the entire set...isn't it great?  These little 3x3 cards are so versatile.  They can be used to send a quick note or even as a gift tag.  There are 4 cards with coordinating envelopes.  The new Simply Scored Diagonal Plate makes creating these envelopes and the box a breeze!


I started with Pool Party card stock to 6" x 3" folded in half for my card base.  The next layer is one of the patterns from the Everyday Enchantment Designer Series Paper (DSP) pack.  This paper is only available as a Sale-a-bration item.  The good news is that you can get this paper for FREE with a qualifying order.  The bad news is that it is only available until March 31st.  I LOVE this paper and do not want to see it going away!  The DSP is 2 3/4" x 2 3/4" and embossed with the Stripes Textured Impressions Embossing Folder.  The embossing folder, too, is a Sale-a-bration item that you can earn for FREE!
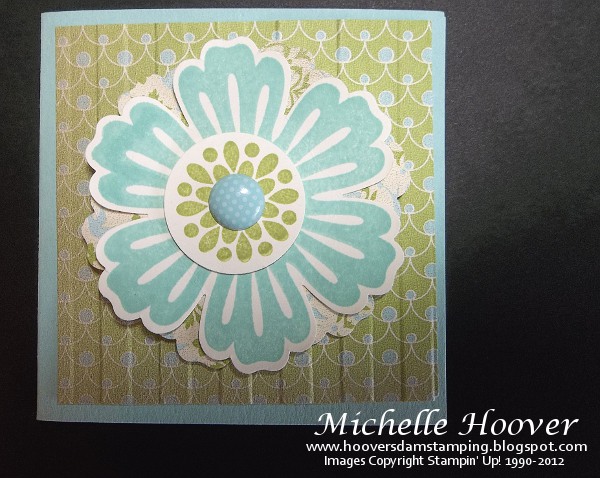

I used the Mixed Bunch stamp set and coordinating Blossom Punch for the focal piece on the card.  The bottom flower is punched from another pattern from the Everyday Enchantment DSP.  Layered on top of that is flower stamped in Pool Party on Very Vanilla card stock and punched out.  The center of the flower comes from the same stamp set, stamped in Lucky Limeade ink on Very Vanilla card stock, and punched out with the 1" circle punch.  The center is then completed with a Pool Party Designer Printed Brad.  I used a few Stampin' Dimensionals to give the flower some, well...dimension, of course!


Next, I created the matching envelopes using the new Simply Scored Diagonal Plate.  This amazing new tool allows you make coordinating envelopes quickly and easily.  When you purchase the Diagonal Plate you receive instructions for 4 different sized envelopes.  However, you can make an envelope to fit any size card you make! 

There are lots of resources available with measurements and instructions.   You may have seen Donna Griffith's demonstration for how to create an envelope for the standard 4-1/4" x 5-1/2" card.  If you haven't, be sure to check it out!  Also, fellow demonstrator Jackie Topa has put together a FABULOUS envelope resource on her Addicted To Stamping blog.  It's a reference guide for creating envelopes for 28 different sizes of cards!  She includes envelopes for gift cards, invitations, thank you notes, and much more!  Awesome!  Here is the handy Diagonal Score Plate Envelopes PDF!  Plus, you can see a quick video on how to put several different ones together on her Make-Your-Own Envelopes post.


So with the 4 coordinating envelopes complete, now it's on to the box.  Again, this box is made using the Diagonal Plate.  This time the card stock is Lucky Limeade.  The flower is the same as on the card. 

I'm loving this new tool...the possibilities are endless!  And again, fortunately for me, another fellow demonstrator provided all the instructions and measurements!  I love Stampin' Up! demonstrators, they make my job so easy!  The instructions for the box came from Angie Leach at Too Cool Stamping.  She shared this box  along with the tutorials at our last demonstrator meeting.

You can find the tutorials here:
  • Large Card Box (standard size cards) by Jackie Topa—11x11", scored at 3-1/2" and 5-1/2" on two opposite sides, and 4-1/2" and 6-1/2" on other two opposite sides.
  • Small Card Box (3x3" cards, without envelopes) by luvinstampinup—6x6" square, scored at 2-1/4 and 3-1/4" all sides.*
*Please note that Angie adjusted the Small Card Box to new measurements to fit 3x3" notes WITH envelopes (because why would you not want to make custom envelopes, too!).   Hers was 6-1/2" square, scored at 2-1/2" and 3-1/2" on all sides.  These are the measurements that I also used for my box.

Time is running out to get this beautiful Everyday Enchantment Designer Series Paper! Visit my Online Store or contact me today to place your order.

Thanks for stopping by!
Michelle


Tuesday, March 20, 2012

Less Than 2 Weeks Left!

I can't believe Sale-a-Bration is almost over!  This year is flying by.  Although, I have to admit that I am enjoying this early spring weather.


The Sale-a-Bration (SAB) promotion ends March 31st.  There's still time to take advantage of earning FREE products with a qualifying order.  For every $50 you spend you get to select ANY item you would like from the SAB flyer!  Check out the flyer HERE.  If you haven't taken advantage of this promotion or you just don't have all of the free stuff you want yet, you can go directly to my Online Store to place an online order or contact me to place an order.

I'll have more projects to post later, but in the meantime you can see some of my SAB cards by clicking on the Sale-a-Bration link on the right hand side under Categories.

Thursday, March 8, 2012

March Club Cards

I have two new beautiful cards to share with you today.  We will be making both of these at my Stamp Clubs this month.  By the way, I'm getting ready to start new sessions in April for both my Friday and Sunday clubs.  If you are interested in joining please contact me for more information.

The first card I'd like to share with you uses a technique called Versa Shadow that I found on a blog by Erin Gonzales.  She used this technique on an 8x8 scrapbook page.

Created by Erin Gonzales


Here is a photo of her page.  Isn't is gorgeous?  My favorite colors, too!  Here's a link to her post.  She even shows a video of the technique.  I love her style and can't wait to CASE more of her beautiful projects!


So, here is the card that I was inspired to make after seeing Erin's scrapbook page.  I just LOVE it and it's so easy to do!  The card base is Basic Gray card stock that has been stamped on with Whisper White Craft ink using the Mixed Bunch stamp set.  Keep in mind that when you are using craft ink that it takes a little longer to dry and will smear if not completely dry.  I used my heat tool to speed things up a little.  Lord knows that I'm not the most patient person...LOL!  The patterned paper is a piece from the Twitterpated Designer Series Paper.


To get the "shadow" effect you simply draw around your stamped image with a VersaMarker.  How cool is that?  It looks fantastic on this Basic Gray card stock.

The Baker's Twine in Wisteria Wonder is just tied in a knot through the holes in the buttons.  The buttons are Elegant Eggplant, Rich Razzelberry, and Old Olive and adhered using Mini Glue Dots.

You can also see the 3/8" Pleated Satin Ribbon very well in this photo.  It's in Pear Pizzazz and adds just the right touch!


The card is finished off with another flower image stamped in Concord Crush from the Mixed Bunch stamp set and punched out using the coordinating Blossom Punch.  The center is from the same set and is stamped in Pear Pizzazz.  The "hello" is from the Tiny Tags set, stamped in Rich Razzelberry, punched out with the Jewelry Tag punch, and adhered to the center of the flower with a Rich Razzelberry brad.  The entire flower was popped up with a double-stacking of Stampin' Dimensionals.

So what do you think?  I'd love to here your comments.  Just on Comment down below.

List of supplies:
Stamps:  Mixed Bunch and Tiny Tags 
Ink and Markers:  Whisper White Craft Ink; Concord Crush, Pear Pizzazz, and Rich Razzelberry Classic Ink; VersaMark Pad; and a VersaMarker 
Paper:  Twitterpated Designer Series Paper and Basic Gray and Whisper White Card Stock
Accessories:  Elegant Eggplant, Rich Razzelberry, and Old Olive Buttons; Pear Pizzazz 3/8" Pleated Satin Ribbon; Wisteria Wonder Baker's Twine; and a Rich Razzelberry Brad  
Tools:  Blossom Punch, 3/4" Circle Punch, Jewelry Tag PunchMini Glue DotsStampin' Dimensionals, and SNAIL Adhesive


On to card #2....


What a difference between the two, huh?  I love how elegant this one seems.  It's so much prettier in person, too... the photos don't do it justice.  Of course, that may have something to do with the photographer :).

As I mentioned, this card uses a technique called Double Embossing.  It is texture embossed AND heat embossed.  It's actually much easier than it looks, too.

The card base is Naturals Ivory with a piece of Basic Black on top.  Next is a piece of Mocha Morning Designer Series Paper (DSP).  Here's where the fun begins!


To do the textured embossing I used the Vintage Wallpaper embossing folder.  Prior to running this through your Big Shot, though, you have to ink up the embossing folder with VersaMark.  Use a brayer and ink up the de-bossed side of the embossing folder...the side that is "indented" not raised.  Place your DSP face down onto the inked side of the embossing folder and run it through the Big Shot like normal.  When you remove your paper from the embossing folder keep in mind that it is covered in VersaMark and try to keep your fingers out of it.  Next, cover the DSP with black embossing powder and heat using the heat tool.


That's all there is to this Double Embossing technique.  That was pretty simple, right?  I love how the DSP only shows up on the embossed/raised areas of the card.  I don't know if you can tell in the photo above, but it really gives the card some extra dimension.


 In the photo on the right, you can see the focal image.  It's a piece of Naturals Ivory card stock stamped in Basic Black with the Kindness Matters stamp set.  This set is part of the Sale-a-bration promotion currently going on.  That means that you can get this set for FREE with a $50 order!  Click on the Sale-a-bration link at the top left side of this page to get more information.  Click HERE to go directly to my online store and start shopping now.

Back to the card.  The stamped piece is then layered onto a piece of Brushed Gold card stock and then onto a piece of Basic Black card stock.  I used a few Stampin' Dimensionals to pop up the center piece.  The card is finished off with a piece of Crumb Cake 3/8" Taffeta Ribbon.


List of supplies:
Stamps:  Kindness Matters
Ink:  Basic Black Classic Ink, and  VersaMark Pad
Paper:  Mocha Morning Designer Series Paper and Basic Black, Naturals Ivory and Brushed Gold Card Stock
Accessories:  Crumb Cake 3/8" Taffeta Ribbon
Tools: Big ShotVintage Wallpaper Textured Impressions Embossing FolderBlack Stampin' Emboss PowderHeat Tool Brayer, Stampin' Dimensionals, and SNAIL Adhesive
 Thanks for stopping by!

Michelle

Wednesday, February 29, 2012

Herringbone Technique

Today I'd like to share with you one of the cards we made at my February stamp club meeting.  The Everyday Enchantment Designer Series Paper from the Sale-a-bration (SAB) catalog has to be one of my favorites!  I absolutely love this paper and will be very sad to see it go after March.

The Herringbone Technique has been around for awhile, but I was just introduced to it recently by Angie Leach from Too Cool Stamping.  As many of you know, Angie is my upline and one of my wonderful friends (hi Angie!).  Angie has a pictorial of the this technique here.  Dawn Olchefske, another incredible Stampin' Up! demonstrator, has a video tutorial on her blog showing how easy this technique really is.  You can find her video here.  On to my card...


This card is loaded with SAB items!  As I mentioned, the patterned paper is Everyday Enchantment Designer Series Paper (DSP).  This technique is also a fabulous way to use up all of those scraps that pile up next to your paper cutter. :)


Here's a close up of the herringbone pattern.  The strips of DSP are mounted on a piece of Very Vanilla card stock using the Big Shot Multipurpose Adhesive Sheets.  These are great when you need to have adhesive on a large area.  I simply cut my card stock and the adhesive sheet to same size and put the adhesive on the card stock to make the whole piece "sticky."  Next, I started assembling my strips of DSP to make the herringbone pattern.


In the photo to the right you can see my sentiment stamped in Lucky Limeade from the Elementary Elegance stamp set, also a SAB set.  I also added the crown image stamped in Poppy Parade along with a little rhinestone "bling".  This was stamped on Very Vanilla card stock and punched out using the Extra-Large Oval punch.  I love how this fits perfectly inside the oval shaped Designer Frames Textured Impressions Embossing Folder.  This, too, is available as a FREE SAB item.  The Poppy Parade card stock was embossed first with the embossing folder and then I ran it through the Big Shot again using one of the dies from the Labels Collection Framelits Dies.  Doesn't this just fit perfectly?  This piece was then mounted on a piece of Very Vanilla card stock which also was cut from one of the framelits and then embossed with the Stripes Embossing Folder (another SAB item).  A cute bow made from the 1/8" Organdy Ribbon in Lucky Limeade finishes off the card.  The ribbon is also a SAB item!

Whew... that's a lot of SAB items!  Here they are:  Everyday Enchantment Designer Series Paper, 1/8" Organdy Ribbon from the Everyday Enchantment Ribbon & Brad Pack, Designer Frames Textured Impressions Embossing Folders, Stripes Textured Impressions Embossing Folder, and the Elementary Elegance Stamp Set.  Remember that you can get any of these items for FREE with a $50 order!  Sale-a-bration ends on March 31, 2012...don't miss out on this promotion!  You can click on the Sale-a-bration link in the upper left corner to see more details.

Do you want to make this card?  I still have a couple of dates available for workshops in March.  Contact me today to get scheduled!

List of supplies:
 Thanks for stopping by!
Michelle
 

Monday, February 27, 2012

Twitterpated Hearts

Today's card is a CASE (copy and share everything) of a card I saw on Stampin Connection created by Michelle Clarke.  Here are the two cards side by side...


Created by Michelle Clarke
My CASED version

I'm usually not into hearts, but I think this turned out pretty cute.  In the photo to the right you can see the details a little better.  Both pieces of patterned paper are from Twitterpated Designer Series Paper.  The hearts are cut using the Framelits Hearts Collection with the Big Shot and are done in Blushing Bride and Riding Hood Red.  I love how quick and easy the framelits are to use!  The Blushing Bride heart is embossed using the Snow Burst Textured Impressions Embossing Folder from the Holiday Mini Catalog (which is still available).  I thought this design sort of mimicked the design in the Twitterpated paper.  The Riding Hood Red heart was embossed using the Fresh Vintage stamp set and clear embossing powder.  This stamp set is a Sale-a-bration item and can be yours for FREE with a $50 order.  Visit my demonstrator website today to start shopping!


The card is embellished with some Baja Breeze 3/8" Pleated Satin Ribbon, a Baja Breeze button from the Twitterpated Designer Buttons, and a piece of Cherry Cobbler Baker's Twine.  It also has a scallop border made from the Tasteful Trim Die and the Big Shot.  It's finished off with the sentiment from Loving Thoughts stamped on that scroll from Take it To Heart.  All of this is on a Crumb Cake card base.    

List of supplies:
 I hope you enjoyed the card and thanks for stopping by!


Michelle

Wednesday, January 25, 2012

Sale-a-Bration is Here!

SAB 2012 banner

 
It's that EXCITING time of year again...Sale-a-Bration means FREE GOODIES
for customers, hostesses, new recruits & demonstrators!!
 
Click on the HERE to see the SAB catalog.

For every $50 you spend - select a FREE GIFT from the Sale-a-Bration catalog...no limit!  

Host a $150 workshop - get THREE free Sale a Bration gifts PLUS the adorable FREE Sale a Bration Tote (see photo below) PLUS $25 in free hostess dollars to spend in the catalog!
SAB hostess bag 

Host a $400 workshop - you get a bundle of three Sale a Bration items on pages 6 & 7; the Fresh Vintage stamp set, the Everyday Enchantment designer series paper and the Everyday Enchantment Ribbon & Brad pack.  

Call or e-mail me to schedule your workshop before SAB is over!