Saturday, September 7, 2013

Chris's Butterfly Bundle Pop Up Card

Before I get to today's card, just a few reminders:

New Products and Promotions
Upcoming Events
____________________________________________________________________

I received this card from Chris Kistler awhile ago and realized that now is the perfect time to share it with you.  Why?  Because it features products from the current Butterfly Bundle promotion.  And wait until you see the surprise inside!
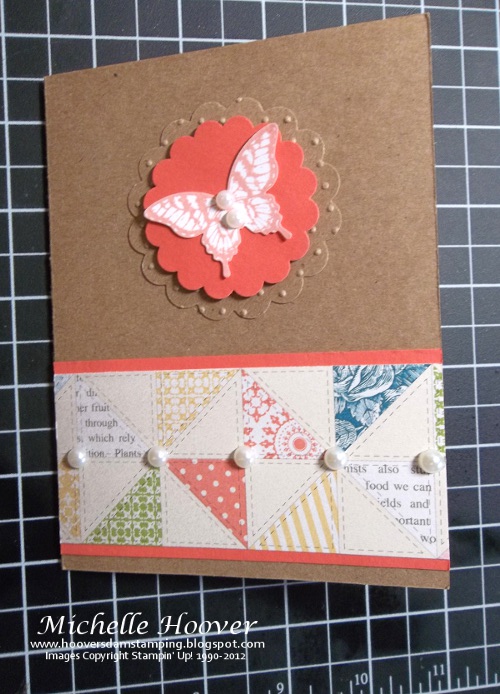


Isn't it beautiful? Chris started with a Crumb Cake Card Stock base.  The Designer Series Paper is Tea for Two and is retired now, but the Afternoon Picnic DSP in the current catalog has the exact same patterns just in a different color palette.

I love how she used the Pearl Basic Jewels to accent the bottom and the butterfly!


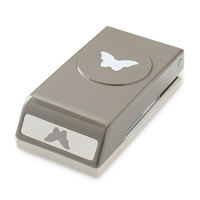
Here's a close up of the Papillon Potpourri butterfly.  Its stamped in Calypso Coral Classic Ink and punched out using the Elegant Butterfly Punch.  It's perched perfectly on a piece of Calypso Coral Card Stock punched with the 1 3/4" Scallop Circle Punch and a piece of Crumb Cake Card Stock punched with the 2 3/8" Scallop Circle Punch.  The Crumb Cake scallop circle has also been embossed with the Perfect Polka Dots Embossing Folder.

And now for the surprise inside ...


When you open this card this is what you find.  It's a fantastic pop up card!

Just look at those adorable little butterflies!  These were punched from Calypso Coral Card Stock using the Bitty Butterfly Punch.  Chris also embellished these with the Pearl Basic Jewels.  Super cute!


Here it is from another angle.


In this photo you can see the "Oh, Hello" sentiment from the Oh, Hello stamp set.  It's stamped in Early Espresso Classic Ink.  Isn't it perfect!

The oval window is created with the Ovals Collection Framelits using two of the sizes to make the perfect frame for the the sentiment inside.

Isn't she talented?  I wanted to thank Chris for sharing this card and all of her other projects with me.  She is always sharing new ideas and inspirations and truly appreciate it!


  Just imagine the awesome cards you could make with this bundle.  Now Thru September 30, 2013, order the Papillon Potpourri stamps set and Bitty Butterfly Punch together in a special Butterfly Bundle #1353111 (wood #135312) and save 15%! 

Order the Butterfly Bundle at my Online StorePlace your online order today and use the Hostess Code AZPDWTPF.
  
Thanks for stopping by,
Michelle


Wednesday, September 4, 2013

Holiday Catalog Product Share

 All Seasonal Products


Do you love the new Holiday Catalog from Stampin' Up!? My wish list is huge! I'll bet yours is, too!  I heard someone say her wish list was longer than her grocery list ... LOL!


The Holiday Catalog has been out for a month already!  That's just hard to believe.  I guess I just have a hard time making holiday projects in August.  It's definitely time though to get started on all of the projects!  So, I put together a little product share sampler with a little bit of everything -- all my favorite must-haves for the coming holiday seasons (Halloween, Fall/Thanksgiving, and Winter/Christmas).

Below are photos of all of the items featured in this Holiday Catalog Product Share.  That's a lot of stuff!

                                  1-1/4 Burlap Ribbon  Cherry Cobbler 1 Grosgrain Stitched Edge Ribbon Silver 1/8 Ribbon                                

                                                  Sweater Weather Designer Series Paper  Witches' Brew Designer Series Paper

                                 Season Of Style Designer Series Paper  Winter Frost Specialty Designer Series Paper Silver Foil Sheets

                                                Old Olive Simply Styled Embellishments  Frosted Finishes Embellishments

                               White Stampin Chalk Marker  Mini Muslin Bags Decorative Window Gift Box

                                             Holly Jolly Greetings Simply Sent  Merry Little Christmas Simply Created Card Kit

                             Pretty Presents Designer Bows  Pretty Presents Designer Tags Season Of Style Designer Journaling Tags

It would cost you over $180 to purchase all of these accessories on your own! Sign up for my product share and try a little bit of everything for only $39.95 + S/H. It's actually a savings of over $140!  Each Holiday Catalog Product Share includes:

  • (1 yd) 1-1/4" Burlap Ribbon
  • (2 yds) Cherry Cobbler 1" Stitched Edge Grosgrain Ribbon
  • (2 yds) Silver 1/8" Ribbon
  • (6) 12" x 6" sheets of Sweater Weather Designer Paper
  • (6) 12" x 6" sheets of Witches' Brew Designer Paper
  • (6) 12" x 6" sheets of Season of Style Designer Paper
  • (5) 12" x 6" + (2) 6" x 6" Foiled Winter Frost Specialty Designer Paper
  • (1) 12" x 6" Gold Foil Sheet
  • (1) 12" x 6" Silver Foil Sheet
  • (3) Old Olive Simply Styled Embellishments
  • (3) Frosted Finishes Embellishments
  • (1) White Stampin' Chalk Marker
  • (2) Mini Muslin Bags
  • (1) Decorative Window Gift Box
  • (3) Holly Jolly Greetings Simply Sent Cards
  • (2) Merry Little Christmas Simply Created Card Kits
  • (2) Pretty Presents Designer Bows
  • (8) Pretty Presents Designer Tags
  • (8) assorted Season of Style Designer Journaling Tags

Ready to get yours? Reserve your product share now by emailing me today.

 Please include the following information in your email:
1.  Full Name
2.  Mailing Address (United States addresses only)
3.  Email for Paypal invoicing (if different from the one you email me from)

When each product share is full (4 people per share), I will send you a Paypal (*) invoice for the product share ($39.95 + $12.35 s/h) and order the product.

All shares will be sent via Priority Mail.  Please allow about two weeks for delivery since I need to order the product, cut and divide it up and then send it to you.

(*) I use Paypal for all my billing needs.  However, a paypal account is not required to make your payment.  Just an email address and credit/debit card is all you need.  When you receive my paypal invoice, you can choose to pay using your paypal account funds or by credit/debit card.  Just follow their SUPER EASY instructions to make your payment via the method that is most convenient for you. 

Click HERE to Order Stampin' Up! Products Online, Anytime!


NEW! 2013 Stampin' Up! Holiday Catalog
View Online

Thanks,
Michelle

Tuesday, September 3, 2013

Gently Falling, Envelop Punch Board and New Stamp Club(s) Forming NOW

Today's card is one we will be doing at my Open Stamp Club this Friday.  It features the Gently Falling Stamp Set and an envelope to match.  What is an Open Stamp Club you ask?  Well, you find those details at the end of this post.

I have to admit that I really like how this card turned out.  What a great fall card!  This card measures 4x8 and will fit in a traditional business size envelope.  However, as you'll see below, I made my own matching envelope with the new Envelope Punch Board.

The card base is Chocolate Chip Card Stock and is layer with a beautiful piece of Designer Series Paper (DSP) from the Holiday Catalog called Sweater Weather.

Sweater Weather Designer Series Paper       This paper is filled gorgeous fall colors. 


Here you can see one of the stamped leaves.  This Rock-n-Roll or Rolling technique has been around for quite some time and works perfectly for these fall leaves.  It's very simple to do.  Using Classic Inks, I inked up my leaf image in Crushed Curry and then rolled off some of the ink onto scrap paper.  I just rolled the edges of the stamp in a circular motion.

Next using that same circular motion, I rolled the edges -- just the edges! -- of the stamp (still with the Crushed Curry ink on it) in Tangerine Tango ink and stamped onto Very Vanilla Card Stock.

Tip:  Always use one lighter ink and one darker ink.  Ink up your stamp in the lighter ink first as to help avoid contaminating your ink pads.

The outline image was then stamped in Chocolate Chip.


The bottom of the card is embellished with 1 1/4" Burlap Ribbon that I cut in half and frayed the edges a little.  The "thankful" was cut from Chocolate Chip Card Stock using the Expressions Thinlits Dies.  Oh my gosh, I love these!  It also comes with the words "Merry" and "Love".  We will definitely be using this in my Holiday Stamp-a-Stack Card Classes!  I used Tombow Multi-Purpose Adhesive to adhere it on top of the burlap ribbon.


It's then finished off with one of the Naturals Designer Buttons and some Linen Thread.


But wait, that's not all!  Here is my card being tucked into a Chocolate Chip Card Stock Envelope.  The Envelope Punch Board makes making envelopes so easy!  Now you can make that card whatever size you want without the fear of not having an envelope that it will fit in.  That's AWESOME!  You get the ability to make 66 different sized envelopes all for $19.95.  And, although I didn't do it here, you can make your liners with it, too!


Here's one last photo with the card all the way inside the envelope.  Perfect!


As promised at the beginning of this post, here is more information on my Open Stamp Club.

How Does an Open Stamp Club Work?
Members place one order, once a month, over a 6-month period (minimum order is $25).  During one month of the six, they'll earn a minimum of $25 in Hostess Dollars (and usually more!) to spend on anything in the current catalogs.

Why is it called an "Open Stamp Club"?
Anyone can attend a monthly club meeting.  You do not have to be a member to come and stamp.  If you're not a member you attend for FREE by placing a minimum $25 order that night or can pay the class fee of $15 without placing an order.  Only members are eligible for the Hostess Benefits, though.

When Does Stamp Club Start?
My current club will end this month.  So, we will start a new session(s) of club in October.

When Does Stamp Club Meet?
My current club meets on the 2nd Friday each month at 7:00pm.  However, I am always open to adding another evening during the week or even a weekend day.  If you want to join, but Friday's don't work for you just email me the day(s) that you are interested in.  If I get at least 6 people interested in the same day, we'll start another club.

Want your own exclusive club with your friends and family?
 Just get 5 of your friends and start your own private club!  It will work like the Open Stamp Club as far as ordering goes, hostess benefits, and the number of moths we meet, but it will be an exclusive group for you and your friends!  Guests may attend by invitation of one of your members.  Minimum order or class fee applies to all guests.

Ready to join?  CONTACT ME today to sign up!  

Still have questions?  Contact me for all the details!

Thanks for stopping by,
Michelle


Monday, September 2, 2013

15% Off Butterfly Bundle


Now Thru September 30, 2013, order the Papillon Potpourri stamps set and Bitty Butterfly Punch together in a special Butterfly Bundle #1353111 (wood #135312) and save 15%! 
 

Papillon Potpourri Clear-Mount Stamp Set
Papillon Potpourri Stamp Set
   
Bitty Butterfly Punch

I just love this stamp set and BOTH of the coordinating punches.  Not only does the Bitty Butterfly Punch coordinate with this set, but so does the Elegant Butterfly Punch.

Here is a scrapbook layout that we did in my Scrapbook Class.  I'm sorry the lighting is really bad on these photos.  I got a lot of glare from the light on the right side :(

 The pages are 12x12 and start on 12x12 Very Vanilla Card Stock.  The Designer Series Paper (DSP) is Afternoon Picnic.  I used the Big Shot and Tasteful Trim Bigz XL Die for the Wisteria Wonder scalloped edge along side of the DSP.


This layout is all about those amazing mothers out there!  The sentiment is stamped using Elegant Eggplant Classic Ink and is from the You're Amazing Stamp Set.  It is stamped on Wisteria Wonder Card Stock that has been cut out using the Apothecary Accents Framelits.


With the Big Shot, I cut a circle using the 3" Circle Orginals Die and then embossed it with the Perfect Polka Dots Embossing Folder.

The flowers are from the Stippled Blossoms Stamp Set.  This is such a BEAUTIFUL set!  I used Wisteria Wonder and Elegant Eggplant for the flowers and Pear Pizzazz and Always Artichoke for the leaves.

Those cute little flowers were made using the Simply Pressed Clay with the Buttons & Blossoms Simply Pressed Clay Molds.  After they were dry (I let them sit overnight), I colored them to match using an Elegant Eggplant Marker.  I think they were the perfect embellishment for this page!


In this photo, you can see the larger flowers.  They were stamped the same way as the smaller ones up top.  Aren't they just gorgeous?  

Believe me, this is NOT difficult!  The stamps do all the work for you.  Also, using the clear mount stamps makes this very easy to line up the images.

Don't let this stamp set intimidate you. It makes such beautiful flowers!


Here's the right side.  Again, more of those gorgeous flowers.


And finally, those cute little butterflies.  They were stamped on Wonder Wisteria Card Stock with the Papillon Potpourri Stamp Set using Elegant Eggplant Classic Ink and then punched out with the Bitty Butterfly and Elegant Butterfly punches.

The circles are made with the 3 1/2" Circle Originals Die and the 3" Circle Originals Die and are cut from Pear Pizzazz and Very Vanilla Card Stock.  The stamped lines are from a retired set called Notes & Details.  I confess that I still use this set frequently for my journeling spots on scrapbook pages.  

I just love the way these pages turned out!


Just imagine the awesome cards you could make with this bundle ... and save 15%, too!


Order the Butterfly Bundle at my Online StorePlace your online order today and use the Hostess Code AZPDWTPF.

Thanks for stopping by,
Michelle

Sunday, September 1, 2013

October's Holiday Stamp-a-Stack Class & Sneak Peek


It's time to register for my 2nd Holiday SAS Class.  For those of you who read my previous post, please note that I have had to change the date to Friday instead of Sunday.  The class will take place on Friday, October 4th at 7pm at my house.

You don't want to miss this one! Contact Me To Register!  Registration Deadline: September 14, 2013

 You can find all the details on my Holiday Stamp-a-Stack Class Series page.

The October class will feature cards using the Festive Flurry stamp set. I highly recommend that you upgrade your class to the Festive Flurry Bundle to include the matching Framelits at 15% off the total cost of purchasing them separately.

This stamp and framelit set is becoming very popular.  I'm seeing projects on the blogs.  We will also be using the Winter Frost Specialty Designer Series Paper and Paper Stack.  This paper is just gorgeous!

                             Festive flurry stamps 131781L           Festive flurry framelits 132193L                                

Here are the class options:
Can't make it to class?  Get a Class-to-Go Kit!  Details on my Holiday Stamp-a-Stack Class Series page.

***Want More Cards?  You can add a dozen more cards to any class for only $10 more!***
All class fees include supplies and embellishments to create 12 cards (6 each of two designs), plus envelopes.  All Class-To Go Kits will have pre-cut supplies, plus card instructions and supplies list. You will need to add your own inks, adhesives, embossing powders, piercing and glitter.

Supplies Needed For September Class-To-Go: For card design #1 -  Pool Party Ink, Smoky Slate (or you could substitute Basic Gray) Ink, VersaMark & Silver Embossing Powder. For card design #2 - Island Indigo Ink and Silver Metallic Encore Pad (or you could substitute either Smoky Slate or Basic Gray).  I can add anything you need to your order when your register and get you a total.  Or you can simply place an online order from my Online Store to get anything you need.
Contact me By September 14th To Register!  

Before You Register:
Please review the  Holiday Stamp-a-Stack Class Series page for complete info. Payment is due with your registration. Shipping is additional on Class-To-Go Kits. 
_____________________________________________________________________
Did You Miss The September Class?  It's Not Too Late! You still have the chance to take all 4 classes!  September Class-To-Go Kits are still available.  To order, please contact me to register by September 14, 2013.
 Supplies Needed For September Class-To-Go: For card design #1 -  Old Olive and Cherry Cobbler Markers (or you could substitute Old Olive Ink or Cherry Cobbler Ink). For card design #2 - Cherry Cobbler Ink.  I can add anything you need to your order when your register and get you a total.  Or you can simply place an online order from my Online Store to get anything you need.
_____________________________________________________________________
So, here's the BIG REVEAL!  I wasn't going to show the Holiday SAS cards on my blog until all of the classes were finished, but I just can't stand it anymore ... LOL!  I'll post all of the cards along with the details after all 4 classes are complete. 


Here's the first card.  The Washi Tape makes this a quick and easy card to complete.  The Chevron Border Punch adds awesome detail to any project.  You're going to want this if you don't have it yet! 
Next up, this fun "Deck the Halls" card.  I love how the Chevron Embossing Folder coordinates with Season of Style Designer Series Paper Stack.  The card is finished off with a super cute bow. 


Want to make these cards?  It's not too late to order your September Class-to-Go Kit!  Class-To-Go Kits contain all of the pre-cut card stock and embellishments needed to create the cards, and include the featured products as advertised.  Cards are not pre-stamped and kits do not include ink, adhesives, piercing, heat embossing, or glitter.  You will also get instructions on how to complete each card.

It's Here ... Envelope Punch Board!


I'm so excited to share this new tool with you today!  Have you ever wanted to make an envelope to match your card?  Or made a non-traditional size card and then you didn't have an envelope to put it in?  Well, do I have a solution for you!  Stampin' Up! has released the new Envelope Punch Board today.  Be sure to check the end of this post on how you can order yours today!  This is a steal for $19.95.

You are going to love how versatile and EASY this is to use.  You can make 66 different sized envelopes with this one tool!  All the measurements you need are right on the board.  Here's a quick video to show you how it works:


I've been playing a little bit with mine already and I love it.  Here's one of the cards we made at Stamp Club last month with a matching envelope.


 Isn't it fantastic?  I chose to make my envelope in the Eastern Elegance Designer Series Paper to match my card.  You could also make your envelope in coordinating card stock if you prefer.


I used the Sunburst technique on this card.  I've also heard it called Starburst .... not sure which one is correct, but I'm going with Sunburst.  This is a fun, simple technique with a big "wow" factor.  Our coordinating Designer Series Paper (DSP) makes it so easy and the possibilities are endless! 

I started with a Bermuda Bay Card Stock base. 
 
On the left is a piece of Crushed Curry that was ran through the Big Shot using the Fancy Fan embossing folder.

The sentiment is from the Chalk Talk stamp set and stamped in Bermuda Bay Classic Ink.  I used the Chalk Talk Framelits to cut out the top piece and used the 1 3/8" Circle Punch in the center. 

To make it a shaker card, I used the Shaker Frames between to two layers, covered the inside of the punched circle with a piece of Window Sheet, and then filled the inside with a little bit of Champagne Glass Glitter.  Super fun!

The ribbon is Coastal Cabana 3/8" Ruffle Stretch Trim.  This ribbon is great to work with.


The "Sunbursts" are super easy to make.  I started with a 1 1/2" x 4" piece of DSP.  Then using my Stampin' Trimmer, I lined up two of the opposite corners and simply cut the paper in half. 
Just turn your paper over and match up the points on the end.  How easy is that?  Cut as many pieces as you need to cover your project.
Here's a close up of the finished Sunburst.


And here's one last look at the finished card with the coordinating envelope.


Want to learn this technique or use the Envelope Punch Board?  I'd love to show you!  Simply contact me to schedule a workshop or your own private class. 

You can also subscribe to get an email notification whenever I have a new post.  Just enter your email address above on the right.  You'll get an email to respond to in order to activate your subscription.


Find all the supplies to create this project & more at my Online Store!

Ready to order your own Envelope Punch Board?  Place your online order today and use the Hostess Code AZPDWTPF.

Never used a Hostess Code?  Here are a couple of helpful tips for using a hostess code and ordering from my Online Store  :


Thanks for stopping by,
Michelle