I'm so excited to share this new tool with you today! Have you ever wanted to make an envelope to match your card? Or made a non-traditional size card and then you didn't have an envelope to put it in? Well, do I have a solution for you! Stampin' Up! has released the new Envelope Punch Board today. Be sure to check the end of this post on how you can order yours today! This is a steal for $19.95.
You are going to love how versatile and EASY this is to use. You can make 66 different sized envelopes with this one tool! All the measurements you need are right on the board. Here's a quick video to show you how it works:
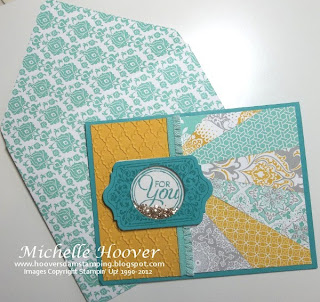
I've been playing a little bit with mine already and I love it. Here's one of the cards we made at Stamp Club last month with a matching envelope.
Isn't it fantastic? I chose to make my envelope in the Eastern Elegance Designer Series Paper to match my card. You could also make your envelope in coordinating card stock if you prefer.
I used the Sunburst technique on this card. I've also heard it called Starburst .... not sure which one is correct, but I'm going with Sunburst. This is a fun, simple technique with a big "wow" factor. Our coordinating Designer Series Paper (DSP) makes it so easy and the possibilities are endless!
I started with a Bermuda Bay Card Stock base.
 On the left is a piece of Crushed Curry that was ran through the Big Shot using the Fancy Fan embossing folder.
The sentiment is from the Chalk Talk stamp set and stamped in Bermuda Bay Classic Ink. I used the Chalk Talk Framelits to cut out the top piece and used the 1 3/8" Circle Punch in the center.
To make it a shaker card, I used the Shaker Frames between to two layers, covered the inside of the punched circle with a piece of Window Sheet, and then filled the inside with a little bit of Champagne Glass Glitter. Super fun!
The "Sunbursts" are super easy to make. I started with a 1 1/2" x 4" piece of DSP. Then using my Stampin' Trimmer, I lined up two of the opposite corners and simply cut the paper in half.
Just turn your paper over and match up the points on the end. How easy is that? Cut as many pieces as you need to cover your project.
Here's a close up of the finished Sunburst.
And here's one last look at the finished card with the coordinating envelope.
Want to learn this technique or use the Envelope Punch Board? I'd love to show you! Simply contact me to schedule a workshop or your own private class.
You can also subscribe to get an email notification whenever I have a new post. Just enter your email address above on the right. You'll get an email to respond to in order to activate your subscription.
Find all the supplies to create this project & more at my Online Store!
Ready to order your own Envelope Punch Board? Place your online order today and use the Hostess Code AZPDWTPF.
Never used a Hostess Code? Here are a couple of helpful tips for using a hostess code and ordering from my Online Store :

Thanks for stopping by,
Michelle


No comments:
Post a Comment